Android加固-壳内容相关
Dex壳
普通Dex壳
App启动流程
熟悉App启动流程才能知道加壳App怎么制作。
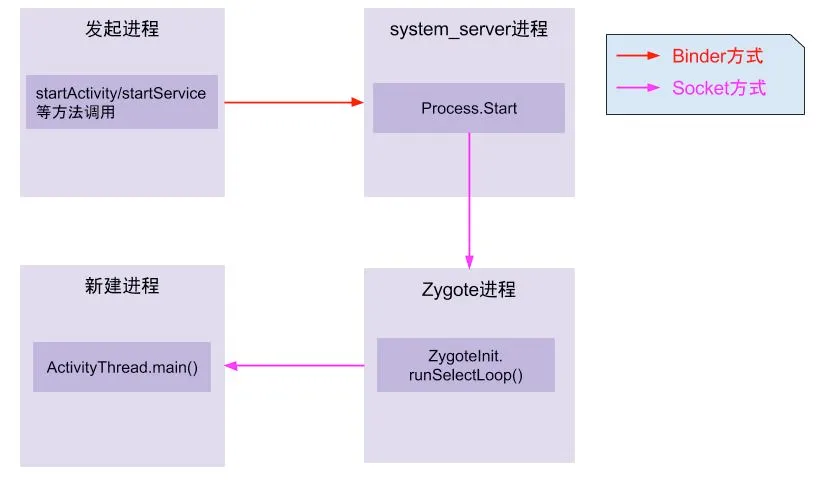
通过Zygote进程到最终进入到app进程世界,我们可以看到ActivityThread.main()是进入App世界的大门,下面对该函数体进行简要的分析,具体分析请看文末的参考链接。
    public static void main(String[] args) {
        Trace.traceBegin(Trace.TRACE_TAG_ACTIVITY_MANAGER, "ActivityThreadMain");

        // Install selective syscall interception
        AndroidOs.install();

        // CloseGuard defaults to true and can be quite spammy.  We
        // disable it here, but selectively enable it later (via
        // StrictMode) on debug builds, but using DropBox, not logs.
        CloseGuard.setEnabled(false);

        Environment.initForCurrentUser();

        // Make sure TrustedCertificateStore looks in the right place for CA certificates
        final File configDir = Environment.getUserConfigDirectory(UserHandle.myUserId());
        TrustedCertificateStore.setDefaultUserDirectory(configDir);

        Process.setArgV0("<pre-initialized>");

        Looper.prepareMainLooper();

        // Find the value for {@link #PROC_START_SEQ_IDENT} if provided on the command line.
        // It will be in the format "seq=114"
        long startSeq = 0;
        if (args != null) {
            for (int i = args.length - 1; i >= 0; --i) {
                if (args[i] != null && args[i].startsWith(PROC_START_SEQ_IDENT)) {
                    startSeq = Long.parseLong(
                            args[i].substring(PROC_START_SEQ_IDENT.length()));
                }
            }
        }
        ActivityThread thread = new ActivityThread();
        thread.attach(false, startSeq);

        if (sMainThreadHandler == null) {
            sMainThreadHandler = thread.getHandler();
        }

        if (false) {
            Looper.myLooper().setMessageLogging(new
                    LogPrinter(Log.DEBUG, "ActivityThread"));
        }

        // End of event ActivityThreadMain.
        Trace.traceEnd(Trace.TRACE_TAG_ACTIVITY_MANAGER);
        Looper.loop();

        throw new RuntimeException("Main thread loop unexpectedly exited");
    }
对于ActivityThread这个类,其中的sCurrentActivityThread静态变量用于全局保存创建的ActivityThread实例,同时还提供了public static ActivityThread currentActivityThread()静态函数用于获取当前虚拟机创建的ActivityThread实例。ActivityThread.main()函数是java中的入口main函数,这里会启动主消息循环,并创建ActivityThread实例,之后调用thread.attach(false)完成一系列初始化准备工作,并完成全局静态变量sCurrentActivityThread的初始化。之后主线程进入消息循环,等待接收来自系统的消息。当收到系统发送来的bindapplication的进程间调用时,调用函数handlebindapplication来处理该请求。
    @UnsupportedAppUsage
    private void handleBindApplication(AppBindData data) {
        //step 1: 创建LoadedApk对象
        data.info = getPackageInfoNoCheck(data.appInfo, data.compatInfo);
        ...
        //step 2: 创建ContextImpl对象;
        final ContextImpl appContext = ContextImpl.createAppContext(this, data.info);

        //step 3: 创建Instrumentation
        mInstrumentation = new Instrumentation();

        //step 4: 创建Application对象;在makeApplication函数中调用了newApplication,在该函数中又调用了app.attach(context),在attach函数中调用了Application.attachBaseContext函数
        Application app = data.info.makeApplication(data.restrictedBackupMode, null);
        mInitialApplication = app;

        //step 5: 安装providers
        List<ProviderInfo> providers = data.providers;
        installContentProviders(app, providers);

        //step 6: 执行Application.Create回调
        mInstrumentation.callApplicationOnCreate(app);
在 handleBindApplication函数中第一次进入了app的代码世界,该函数功能是启动一个application,并把系统收集的apk组件等相关信息绑定到application里,在创建完application对象后,接着调用了application的attachBaseContext方法,之后调用了application的onCreate函数。由此可以发现,app的Application类中的attachBaseContext和onCreate这两个函数是最先获取执行权进行代码执行的。这也是为什么各家的加固工具的主要逻辑都是通过替换app入口Application,并自实现这两个函数,在这两个函数中进行代码的脱壳以及执行权交付的原因。
加壳原理
在App启动流程中我们最终可以得出结论,app最先获得执行权限的是app中声明的Application类中的attachBaseContext和onCreate函数。因此,壳要想完成应用中加固代码的解密以及应用执行权的交付就都是在这两个函数上做文章。下面这张图大致讲了加壳应用的运行流程。
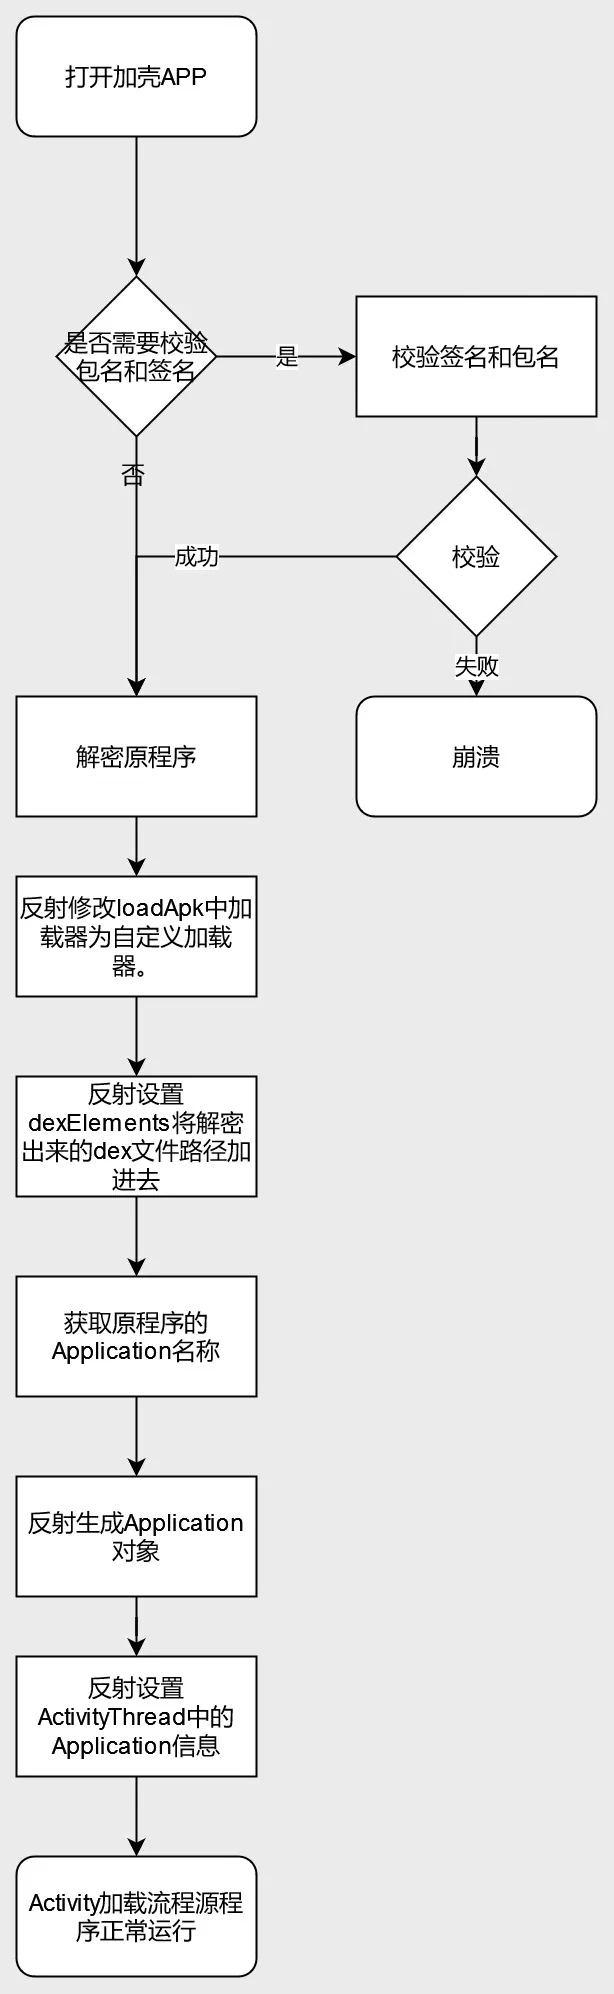
打开加固的app,整个流程如下:如果有签名校验和二次打包校验的话会直接校验签名和二次打包中一些文件是否被更改,如果被更改则崩溃,如果没有就进行加载处理。会在壳程序的application类中的attachbasecontext方法中对原dex进行解密处理,反射修改loadapk中的加载器为自定义加载器,反射设置dexelements将解密出来的dex文件路径加进去,获取源程序的application名称,反射生成application对象,反射设置activitythread中的application信息,activity加载流程源程序正常运行。
ClassLoader在安卓加固中的作用
DexClassLoader加载的类是没有组件生命周期的,也就是说即使DexClassLoader通过对APK的动态加载完成了对组件类的加载,当系统启动该组件时,依然会出现加载类失败的异常。为什么组件类被动态加载入虚拟机,但系统却出现加载类失败呢?
从ClassLoader来看,两种解决方案:
- 替换系统组建类加载器为我们的DexClassLoader,同时设置DexClassLoader的parent为系统组件类加载器;
- 打破原有的双亲关系,在系统组件类加载器和BootClassLoader的中间插入我们自己的DexClassLoader即可;
- 当然也可以对BaseClassLoader子类中的Elements进行合并。
LoadedApk:
private ClassLoader mClassLoader;
// ActivityThread.java
public static ActivityThread currentActivityThread() {
   return sCurrentActivityThread;
}
DexPathList.java 中的
private Element[] dexElements;
这个field是热修复插件经常使用的。通过对Element数组的对象进行合并达到效果。
参考
抽取壳
上班的时候研究过这个,但是碍于当时水平有限,能够脱取抽取壳都无能为力,更别谈研发出来了。抽取壳最重要的就是抽取codeitem并在app运行的时候回填codeitem。相当于是Dex壳加上codeitem抽取并回填。
主要讲解codeitem抽取回填
codeitem抽取
CodeItem是dex文件中存放函数字节码相关数据的结构。下图显示的就是CodeItem大概的样子。

说是提取CodeItem,其实我们提取的是CodeItem中的insns,它里面存放的是函数真正的字节码。提取insns,我们使用的是Android源码中的dx工具,使用dx工具可以很方便的读取dex文件的各个部分。
下面的代码遍历所有ClassDef,并遍历其中的所有函数,再调用extractMethod对单个函数进行处理。
    public static List<Instruction> extractAllMethods(File dexFile, File outDexFile) {
        List<Instruction> instructionList = new ArrayList<>();
        Dex dex = null;
        RandomAccessFile randomAccessFile = null;
        byte[] dexData = IoUtils.readFile(dexFile.getAbsolutePath());
        IoUtils.writeFile(outDexFile.getAbsolutePath(),dexData);

        try {
            dex = new Dex(dexFile);
            randomAccessFile = new RandomAccessFile(outDexFile, "rw");
            Iterable<ClassDef> classDefs = dex.classDefs();
            for (ClassDef classDef : classDefs) {

                ......

                if(classDef.getClassDataOffset() == 0){
                    String log = String.format("class '%s' data offset is zero",classDef.toString());
                    logger.warn(log);
                    continue;
                }

                ClassData classData = dex.readClassData(classDef);
                ClassData.Method[] directMethods = classData.getDirectMethods();
                ClassData.Method[] virtualMethods = classData.getVirtualMethods();
                for (ClassData.Method method : directMethods) {
                    Instruction instruction = extractMethod(dex,randomAccessFile,classDef,method);
                    if(instruction != null) {
                        instructionList.add(instruction);
                    }
                }

                for (ClassData.Method method : virtualMethods) {
                    Instruction instruction = extractMethod(dex, randomAccessFile,classDef, method);
                    if(instruction != null) {
                        instructionList.add(instruction);
                    }
                }
            }
        }
        catch (Exception e){
            e.printStackTrace();
        }
        finally {
            IoUtils.close(randomAccessFile);
        }

        return instructionList;
    }
处理函数的过程中发现没有代码(通常为native函数)或者insns的容量不足以填充return语句则跳过处理。这里就是对应函数抽取壳的抽取操作
    private static Instruction extractMethod(Dex dex ,RandomAccessFile outRandomAccessFile,ClassDef classDef,ClassData.Method method)
            throws Exception{
        String returnTypeName = dex.typeNames().get(dex.protoIds().get(dex.methodIds().get(method.getMethodIndex()).getProtoIndex()).getReturnTypeIndex());
        String methodName = dex.strings().get(dex.methodIds().get(method.getMethodIndex()).getNameIndex());
        String className = dex.typeNames().get(classDef.getTypeIndex());
        //native函数
        if(method.getCodeOffset() == 0){
            String log = String.format("method code offset is zero,name =  %s.%s , returnType = %s",
                    TypeUtils.getHumanizeTypeName(className),
                    methodName,
                    TypeUtils.getHumanizeTypeName(returnTypeName));
            logger.warn(log);
            return null;
        }
        Instruction instruction = new Instruction();
        //16 = registers_size + ins_size + outs_size + tries_size + debug_info_off + insns_size
        int insnsOffset = method.getCodeOffset() + 16;
        Code code = dex.readCode(method);
        //容错处理
        if(code.getInstructions().length == 0){
            String log = String.format("method has no code,name =  %s.%s , returnType = %s",
                    TypeUtils.getHumanizeTypeName(className),
                    methodName,
                    TypeUtils.getHumanizeTypeName(returnTypeName));
            logger.warn(log);
            return null;
        }
        int insnsCapacity = code.getInstructions().length;
        //insns容量不足以存放return语句,跳过
        byte[] returnByteCodes = getReturnByteCodes(returnTypeName);
        if(insnsCapacity * 2 < returnByteCodes.length){
            logger.warn("The capacity of insns is not enough to store the return statement. {}.{}() -> {} insnsCapacity = {}byte(s),returnByteCodes = {}byte(s)",
                    TypeUtils.getHumanizeTypeName(className),
                    methodName,
                    TypeUtils.getHumanizeTypeName(returnTypeName),
                    insnsCapacity * 2,
                    returnByteCodes.length);

            return null;
        }
        instruction.setOffsetOfDex(insnsOffset);
        //这里的MethodIndex对应method_ids区的索引
        instruction.setMethodIndex(method.getMethodIndex());
        //注意:这里是数组的大小
        instruction.setInstructionDataSize(insnsCapacity * 2);
        byte[] byteCode = new byte[insnsCapacity * 2];
        //写入nop指令
        for (int i = 0; i < insnsCapacity; i++) {
            outRandomAccessFile.seek(insnsOffset + (i * 2));
            byteCode[i * 2] = outRandomAccessFile.readByte();
            byteCode[i * 2 + 1] = outRandomAccessFile.readByte();
            outRandomAccessFile.seek(insnsOffset + (i * 2));
            outRandomAccessFile.writeShort(0);
        }
        instruction.setInstructionsData(byteCode);
        outRandomAccessFile.seek(insnsOffset);
        //写出return语句
        outRandomAccessFile.write(returnByteCodes);

        return instruction;
    }
codeitem回填
当一个类被加载的时候,它的调用链是这样的(部分流程已省略):
ClassLoader.java::loadClass -> DexPathList.java::findClass -> DexFile.java::defineClass ->
class_linker.cc::LoadClass -> class_linker.cc::LoadClassMembers -> class_linker.cc::LoadMethod
也就是说,当一个类被加载,它是会去调用LoadMethod函数的,我们看一下它的函数原型:
void ClassLinker::LoadMethod(const DexFile& dex_file,
                             const ClassDataItemIterator& it,
                             Handle<mirror::Class> klass,
                             ArtMethod* dst);
这个函数太爆炸了,它有两个爆炸性的参数,DexFile和ClassDataItemIterator,我们可以从这个函数得到当前加载函数所在的DexFile结构和当前函数的一些信息,可以看一下ClassDataItemIterator结构:
  class ClassDataItemIterator{

  ......

  // A decoded version of the method of a class_data_item
  struct ClassDataMethod {
    uint32_t method_idx_delta_;  // delta of index into the method_ids array for MethodId
    uint32_t access_flags_;
    uint32_t code_off_;
    ClassDataMethod() : method_idx_delta_(0), access_flags_(0), code_off_(0) {}

   private:
    DISALLOW_COPY_AND_ASSIGN(ClassDataMethod);
  };
  ClassDataMethod method_;

  // Read and decode a method from a class_data_item stream into method
  void ReadClassDataMethod();

  const DexFile& dex_file_;
  size_t pos_;  // integral number of items passed
  const uint8_t* ptr_pos_;  // pointer into stream of class_data_item
  uint32_t last_idx_;  // last read field or method index to apply delta to
  DISALLOW_IMPLICIT_CONSTRUCTORS(ClassDataItemIterator);
};
其中最重要的字段就是code_off_它的值是当前加载的函数的CodeItem相对于DexFile的偏移,当相应的函数被加载,我们就可以直接访问到它的CodeItem。其他函数是否也可以?在上面的流程中没有比LoadMethod更适合我们Hook的函数,所以它是最佳的Hook点。
Hook LoadMethod稍微复杂一些,倒不是Hook代码复杂,而是Hook触发后处理的代码比较复杂,我们要适配多个Android版本,每个版本LoadMethod函数的参数都可能有改变,幸运的是,LoadMethod改动也不是很大。那么,我们如何读取ClassDataItemIterator类中的code_off_呢?比较直接的做法是计算偏移,然后在代码中维护一份偏移。不过这样的做法不易阅读很容易出错。dpt的做法是把ClassDataItemIterator类拷过来,然后将ClassDataItemIterator引用直接转换为我们自定义的ClassDataItemIterator引用,这样就可以方便的读取字段的值。
下面是LoadMethod被调用后做的操作,逻辑是读取存在map中的insns,然后将它们填回指定位置。
void LoadMethod(void *thiz, void *self, const void *dex_file, const void *it, const void *method,
                void *klass, void *dst) {

    if (g_originLoadMethod25 != nullptr
        || g_originLoadMethod28 != nullptr
        || g_originLoadMethod29 != nullptr) {
        uint32_t location_offset = getDexFileLocationOffset();
        uint32_t begin_offset = getDataItemCodeItemOffset();
        callOriginLoadMethod(thiz, self, dex_file, it, method, klass, dst);

        ClassDataItemReader *classDataItemReader = getClassDataItemReader(it,method);


        uint8_t **begin_ptr = (uint8_t **) ((uint8_t *) dex_file + begin_offset);
        uint8_t *begin = *begin_ptr;
        // vtable(4|8) + prev_fields_size
        std::string *location = (reinterpret_cast<std::string *>((uint8_t *) dex_file +
                                                                 location_offset));
        if (location->find("base.apk") != std::string::npos) {

            //code_item_offset == 0说明是native方法或者没有代码
            if (classDataItemReader->GetMethodCodeItemOffset() == 0) {
                DLOGW("native method? = %s code_item_offset = 0x%x",
                      classDataItemReader->MemberIsNative() ? "true" : "false",
                      classDataItemReader->GetMethodCodeItemOffset());
                return;
            }

            uint16_t firstDvmCode = *((uint16_t*)(begin + classDataItemReader->GetMethodCodeItemOffset() + 16));
            if(firstDvmCode != 0x0012 && firstDvmCode != 0x0016 && firstDvmCode != 0x000e){
                NLOG("this method has code no need to patch");
                return;
            }

            uint32_t dexSize = *((uint32_t*)(begin + 0x20));

            int dexIndex = dexNumber(location);
            auto dexIt = dexMap.find(dexIndex - 1);
            if (dexIt != dexMap.end()) {

                auto dexMemIt = dexMemMap.find(dexIndex);
                if(dexMemIt == dexMemMap.end()){
                    changeDexProtect(begin,location->c_str(),dexSize,dexIndex);
                }


                auto codeItemMap = dexIt->second;
                int methodIdx = classDataItemReader->GetMemberIndex();
                auto codeItemIt = codeItemMap->find(methodIdx);

                if (codeItemIt != codeItemMap->end()) {
                    CodeItem* codeItem = codeItemIt->second;
                    uint8_t  *realCodeItemPtr = (uint8_t*)(begin +
                                                classDataItemReader->GetMethodCodeItemOffset() +
                                                16);

                    memcpy(realCodeItemPtr,codeItem->getInsns(),codeItem->getInsnsSize());
                }
            }
        }
    }
}
参考
Java2C
关键Java函数native化。
dcc的使用方式
- 首先在app代码合适的位置,如Application的静态代码块或onCreate等,添加加载so库代码,并重新生成apk
try {
    System.loadLibrary("nc");
} catch (UnsatisfiedLinkError e) {
    e.printStackTrace();
}
- 制定编译方式
使用黑白名单
dcc支持使用黑白名单来过滤需要编译或禁止编译的函数. 修改filter.txt,使用正则表达式配置需要处理的函数.默认编译Activity.onCreate,和测试demo中的所有函数.
vi filter.txt
使用注解
在任意包中新增Dex2C注解类
import java.lang.annotation.Retention;
import java.lang.annotation.RetentionPolicy;

@Retention(RetentionPolicy.RUNTIME)
public @interface Dex2C {}
然后使用Dex2C标记需要编译的类或者方法
加固APP
python3 dcc.py your_app.apk -o out.apk
分析
捡重点的说
核心代码,Java 2 C在dcc.py中的compile_dex函数
def compile_dex(apkfile, filtercfg):
    show_logging(level=logging.INFO)

    d = auto_vm(apkfile)
    dx = analysis.Analysis(d)

    method_filter = MethodFilter(filtercfg, d)

    compiler = Dex2C(d, dx)

    compiled_method_code = {}
    errors = []

    for m in d.get_methods():
        method_triple = get_method_triple(m)

        jni_longname = JniLongName(*method_triple)
        full_name = ''.join(method_triple)

        if len(jni_longname) > 220:
            logger.debug("name to long %s(> 220) %s" % (jni_longname, full_name))
            continue

        if method_filter.should_compile(m):
            logger.debug("compiling %s" % (full_name))
            try:
                code = compiler.get_source_method(m)
            except Exception as e:
                logger.warning("compile method failed:%s (%s)" % (full_name, str(e)), exc_info=True)
                errors.append('%s:%s' % (full_name, str(e)))
                continue

            if code:
                compiled_method_code[method_triple] = code

    return compiled_method_code, errors
其中的compiled_method_code产生过程最重要,因为这是Java代码转C代码的实际部分,最后dcc会讲转成的C代码写入以目标类名为名字的.cpp文件中。
首先会对dex文件中的classes、methods、strings、fields做分析;过滤出要转化的函数,再将函数抽离出来转化成C的代码,保留成C代码的字符串,交给code。
然后再将保存好的cpp文件,与前面提到的预设的加载so nc的源码一起编译成so,再重打包出apk。
建议或者优化的点
整个转化的代码大部分都是python写的,在回顾上问的抽取壳,完全可以整合在一块,抽取出来后,在对其内容进行转化,dcc的作者专门做了个ir来做转化,可以说很棒了,但是完全可以整合在一起,这样就是一个加固产品了,就是无法保证稳定性之类的问题。
参考
DexVMP
抽取smali指令变成VM 的opcode,在vm中运行。
可以参考Java2C的过程,无非就是转变的对象不一样,Java2C是转变成C代码,DexVMP就是转变成vmp的opcode,再配合相应位置的调用即可实现opcode的vm解释器进行解释执行。
参考的nmmp项目就是一个DexVMP加固项目,实现上跟上面说的一致,具体实现细节可以阅读源码了解,vm太大,不做过多展开。
参考
SO壳
外部加固-UPX壳
upx壳是一种以压缩为手段的壳,对二进制文件压缩后,执行的时候释放,让静态反编译工具反编译他无从下手,从而实现保护效果。
压缩部分
elf header:这部分保持跟原so文件相同,不过里面部分数据需要修改,比如section headers的偏移等。
program headers:该部分会对第一个LOAD段的size大小做修改(因为使用了upx壳后体积变小了),其他数据保持不变。
sections:这里存放着原so中的节,这些节包括:“DT_GNU_HASH”,“DT_HASH”, “DT_STRTAB”,“DT_SYMTAB”,“DT_REL”,“DT_RELA”,“DT_JMPREL”,“DT_VERDEF”,“DT_VERSYM”,“DT_VERNEEDED”,因为在so中跟重定位相关的节不能够被加壳,并且在文件中的偏移位置需要保持不变,所以一般情况下是在.text节之后开始做压缩处理。
section headers:upx压缩壳会将section headers表上移,放到上一部分的sections后面,并且不做任何压缩处理,原因是在高版本的android系统中会对section headers做校验,需要读取section headers中的数据,因此需要以明文的形式存放在so中。
.shstrtab:这个节用于存放各个section的名字。
l_info:为一个结构体,其格式如下,其中magic为’7fUPX’,各个产商会对此做修改。
{
LE32 l_checksum;
LE32 l_magic;
LE16 l_size;
unsigned char l_version;
unsigned char l_format;
}
p_info:为一个结构体,其格式如下,
{
unsigned p_progid;
unsigned p_filesize;
unsigned p_blocksize;
}
compressed data:被压缩的数据,即实现对代码段做加密。
b_info:为一个结构体,其格式如下,其中sz_unc为压缩后数据的大小,sz_cpr为压缩前数据的大小,b_method为使用的压缩方法。
{
unsigned sz_unc;
unsigned sz_cpr;
unsigned char b_method;
unsigned char b_ftid;
unsigned char b_cto8;
unsigned char b_unused;
}
other info:保存着可以传递给stub的参数,其中包括:dt_init地址,xct_off(sections中最后的地址)等
stub:为整个upx的核心部分,该部分用于运行时解压并还原compressed data。
2th LOAD:为so的第二个LOAD段,因为第二个LOAD段中的dynamic节涉及重定位环节,所以upx无法对其做压缩处理。
PackHeader:为upx的尾部,保存一些upx相关信息。

解压部分
在upx的stub中主要有三个部分,分别为:main、supervise、hatch。
- 在main中使用mmap开辟新空间A,将compressed data、supervise、hatch拷贝到该空间A中。并将pc指针指向A中的supervise开始执行指令。
- supervise中包含这解压过程中所需要的代码包括: 解压算法decompress、过滤器unfilter、其他。在该部分中使用mmap并使用MAP_FIXED参数来开辟内存,该内存地址为原so加载时的空间地址,MAP_FIXED这个参数能够覆盖原来mmap的内存空间,确保解压后数据与原so保持一致。对compressed data做解压处理,并将hatch拷贝到第一个LOAD末尾(多余空间)。在拷贝以及解压完成后,将pc指针跳转到hatch,执行hatch。
- hatch用于unmap释放在1中开辟的空间A,并跳转到原so的dt_init中,如果原so没有dt_init则跳转到linker中。
该过程流程图如下:

参考
内部加固-VMP壳
借助LLVM编译工具,对native代码关键部分做到VMP保护,代码抽取成vm opcode,在原来调用的地方替换成vm接口,实际代码转化成opcode在vm中运行。
没有开源项目先不说了。